
That's more than the price I built one for. If you're building it for indoor use (or porting it), you could use non-treated wood and knock the price down another 30%. I intend to level up a spot and leave it in the rain so I went with heavy treated wood. Here's what I constructed.

Bill of Materials
| (1) | 4'x8' 3/4" Treated Plywood | $38 |
| (1) | 16' 2"x10" Treated Lumber | $20 |
| (2) | 10' 2"x10" Treated Lumber | $34 |
| (1) | box of 2" galvanized nails | $ 3 |
| (1) | box of 3.5" galvanized nails | $ 4 |
| Total | $99 |
So you start out with a piece of plywood and two boards but before you leave Home Depot, have them slice the 8 foot long plywood into a 2 and 6 foot section - easier to get home and a much straighter cut than you can do with your Black and Decker. I also had them cut the 16' 2"x10" into a 10 foot and 6 foot section. So you now have two pieces of plywood, three ten foot boards and a six footer.
Once home, take both of your ten foot planks, mark off the two foot level sections (on opposing ends) and make a line connecting them for cutting (see red line below). I used the six foot side of my plywood as the straight edge for marking the cut line.

Lay your ramp spines out as a frame and you'll see that this thing is going to be a tank. My treated boards were very wet and heavy compared to dried lumber. One was so soggy that I had to cut it twice - once at half depth as my tired old Skil saw couldn't rip the full plank.
So here is my frame laid out and ready to hammer:
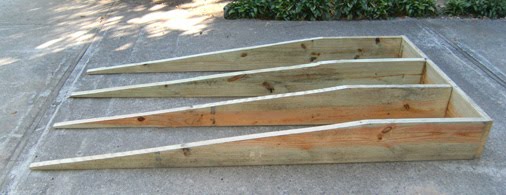
You can see that I've cut the remaining 6 foot piece into the four foot backing. It's best to lay the plywood on it and mark it instead of measuring it to four feet as the plywood size can vary by a quarter to half inch. I used the remaining two foot section and the ten foot board for a cross bracing. I also tacked in a couple of 2x4s to cross brace the studs where they get thin. I tried to predict where the weight would be applied in my son (a right hander) would land and beefed up in those areas. Here's my fully framed skeleton.

Decking
I started to go with decking screws but opted at the last minute for ribbed nails. You can go either way. One final tip; align and set your 6'x4' plywood section first. When you mate the smaller section, it won't matter as much if you are three degrees off plum since it only runs two feet. Do the inverse and you could have a half inch overhang at the end.
Pitching Rubber
I found the perfect pitching rubber on Amazon. It has four corner nails instead of nails along the bottom of the rubber which made it easy to substitute bolts for the nails.

Surfacing the Mound
My son only has metal spikes and they would chew up our handy-work pretty quickly. We initially thought we'd go rubber spikes and the outdoor green carpet (astro-turf) from Home Depot. It would have cost only $35 to cover it but frankly, the carpet looked pretty flimsy. Thin and frail enough that even rubber spikes would quickly wear through it. You never paint pressure treated lumber (though you can seal or stain it), so green paint is out. Someone suggested a couple of large doormats as they're built tougher to handle the treading. I'm still in the hunt and will let you know when I find the ideal surface.
Wheels
If you go the indoor route, it would be easy to bolt on two wheels to the frame. For a couple of dollars, I'd also screw in a couple of screen door handles to make it easy to hoss around.
I hope this is helpful. I'll upload videos to http://www.powerchalk.com as we use it.

Thanks, I'm about to make one of these myself.
ReplyDeleteDid you ever find a good surface carpet for this?
I have seen your Blog... It’s too informative. There are many posts which are really too Good and very useful.
ReplyDeletePortable Buildings
Coach Chaz,
ReplyDeleteThis is a great instructable. How would you cut this in order to make it foldable with hinges so that it is portable?
In need of a lightweight portable mound for a 10u travel team. We practice at a few local parks that do not offer the pitchers mound. Ideal one would be if it can fold up and transported in a car. Any ideas? Thank you!
ReplyDeleteThis might blow the mind, but you really don't need the middle area. Use two sections. The mount 4ftX2ft and a landing area on the same slope about 4ftX3ft. Each pitcher has a slightly different step and it can be placed according to their liking. They would get used to the gap after a little practice. Two pieces would be lighter and more portable.
Deleteor when building just notch out the along the edge on the front of the mount and at the back of the landing area and simply lay piece of wood in there like leaf to a table so the players don't get all head gamed out from the gap. lol... pitchers.
DeleteWhy can't he just use tennis shoes, or something of a similar construction.
ReplyDeleteDoes the slope angle matter? Is it supposed to drop 1" every 1'? If you cut from 10" down 6' the slope changes? Does that matter?
ReplyDeleteIf this were the correct slope there would be 4 inches left at the end of the slope. This slope is too steep.
DeleteThanks for the great idea! I adjusted the height for my Little League son, where the mound is only 6 inches heigh. Change the 2x10s to 2x6s, use the same dimensions and presto! A LL pitching mound. Oh and at 6 inches high you get the "1 inch every 1 foot" drop as well.
ReplyDeleteWhere does the rubber go? I'm an engineer too, i need the specs.
ReplyDeleteThanks for the plans. I think I built this about a week after your post 5 years ago. I just sold the pitching mound to a dad with a LL kid. It was great to get extra reps in with this backyard mound. It held up great. I just replaced the indoor/outdoor carpet a few times...my boys used their sneakers....no cleats.
ReplyDeleteSo youbused indoor outdoor carpet tonout over the plywood correct?
DeleteThanks for the instructions! I will modify as needed to build some ramps for my elderly parents.
ReplyDeleteAny pictures after it was finished?
ReplyDeleteI plan on using this plan, I'm going to sheet with plywood but then put a horse stall mat on top. That way it will weather much better.
ReplyDeleteThis comment has been removed by the author.
ReplyDeleteGreat build. The only issue I see is the slope is too steep. Major league specs are 1" drop per foot not 10"/6ft. http://www.turface.com/resources/article/basic-mound-specifications. Helps me a lot though. Might just buy two extra 2x10's and slope to the ground after the 2ft. or if I want it exact buy 12ft 2x10's and cut them to 11ft and then have a 1ft platform and slope the remaining 10ft to the ground. I've also seen separating it 1/2 way and putting on hinges for storage. Thanks for the post!
ReplyDeleteYour plan got me thinking, so thanks. But to make slope official with a 10" rise, you need either a 4" drop at end of 6ft sloped plywood, or you need to extend to 10ft. Since its a practice box I'd go with the 4" drop at end. Assuming 10" is correct for 13yrs and up. 11-12yr needs 8" rise (2" drop) and 9-10yr needs 6" rise (no drop). Technically, if you are using a 6' piece of plywood, the length of bottom piece is actually just a tad shorter. Remember triangle Pythagorean Theorem.
ReplyDeleteHello and thank you for sharing this, $ is tight and I am disabled but your idea made this project something that I could handle, thank you again my cousin that I'm building it for is very excited , sports is a great activity to keep kids busy and away from the internet. Thank you again
ReplyDeleteTry going to new home construction sites and asking about the wood in or near the dumpster, they may have the plywood and 2by 10's you need and let you have them free. Again, just be sure to ask first
DeleteHello. Thanks for Sharing useful ideas with us. Please do check here...
ReplyDeleteEssex beach huts.
I built this last year and covered it with bed liner. You can get a spray kit from Duplicolor for about $50. Holds up to punishment and it really anti-skid. Was also able to paint a center line for reference.
ReplyDeleteThank you so much for sharing the good post.I like the way of writing and presenting. we are also dealing in Portable Buildings in UK
ReplyDeleteWoodworking guide offers anyone of any skill level the ability to build amazing projects. The guide is extra helpful because it offers more detailed explanations, videos and blueprints then your typical woodworker magazine.
ReplyDeleteDownload over 16,000 WOODWORKING Plans at here
http://woodworkingplanspro.weebly.com
Hope it will help you next time !
Arbor Projects ,
Adirondack Chairs ,
Artwork Display ,
Bathroom Unit ,
Box Designs ,
Billiard/Pool Table ,
Barn Plans ,
Bed Plans ,
Bedside Cabinets ,
Bee Hive Plans ,
Bench Projects ,
Bird Feeders ,
Birdhouse Plans ,
Boat Plans ,
Book Case Plans ,
Baby Changing Table ,
Coat Rack ,
Cabin Plans ,
Cabinet Plans ,
Carport Plans ,
Cart Plans ,
Cat House Plans ,
CD/DVD Holder ,
Cellar Projects ,
Chair Plans ,
Chest Designs ,
Chicken Houses
Childrens Room Plans ,
Clock Plans ,
Coasters ,
Coffee Table Designs ,
Cold Frame Plans ,
Compost Bin ,
Computer Desk ,
Containers ,
Cradle Projects ,
Small Crafts ,
Cutting Board ,
Deck Plans .
Made one today . . . came out fantastic
ReplyDeleteNothing beats fish above a campfire. More information on Privacy Policy | Camp Shores on campshores.com.
ReplyDeleteYou can always adjust the height by adding a 4x4 or 2xs the end.. from experience all mounds are not equal some are really high with too much slope.. others barely any rise at all.
ReplyDeleteDid you ever find a good surface for the mound?
ReplyDeleteThis comment has been removed by the author.
ReplyDeleteAkcern Elite Corporation exists within this market since 1993 and has every one of the licenses for implementation of all sorts of activity. If you are more curious about kamurjshin then you can learn more about it on www.kamurjshin.am.
ReplyDeleteThis comment has been removed by the author.
ReplyDeleteCreate your own collection of things you need to get shown in your home. More information on home builder glenview on Greenleaf Developers Glenview Home Additions and New Homes | Glenview Illinois Home Builder.
ReplyDeleteThis comment has been removed by the author.
ReplyDeleteIt can be difficult to understand which composter is going to be the very best option for your requirements. One the bin was filled, they'll be turned every so often in line with the instructions.Click here to know more about this site.
ReplyDeleteBuilt a couple ($53 in material), a few suggestions.
ReplyDelete1. Weight/Hauling around. Built pitching rubber deck separately, 8’ narrower and added 2 gate latches (optional) to hold it to the landing platform. Much easier to haul around.
2. Specifications. Check the rules/Reg’s for your league. They almost always have spec’ in rules. E.g 10U Pony is 4” tall w/ “gradual” slope.
Thanks coach Chaz, good stuff
Can you tell me where to put mound. How far from back of the pitching mound and how close to where slop starts
ReplyDeleteHow Lemeridian funding service grant me a loan!!!
ReplyDeleteHello everyone, I'm Lea Paige Matteo from Zurich Switzerland and want to use this medium to express gratitude to lemeridian funding service for fulfilling his promise by granting me a loan, I was stuck in a financial situation and needed to refinance and pay my bills as well as start up a Business. I tried seeking for loans from various loan firms both private and corporate organisations but never succeeded and most banks declined my credit request. But as God would have it, I was introduced by a friend named Lisa Rice to Le_meridian funding service and undergone the due process of obtaining a loan from the company, to my greatest surprise within 48hrs just like my friend Lisa, I was also granted a loan of $216,000.00 So my advise to everyone who desires a loan, "if you must contact any firm with reference to securing a loan online with low interest rate of 1.9% and better repayment plans/schedule, please contact Le_meridian funding service. Besides, he doesn't know that am doing this but due to the joy in me, I'm so happy and wish to let people know more about this great company whom truly give out loans, it is my prayer that GOD should bless them more as they put smiles on peoples faces. You can contact them via email on {lfdsloans@lemeridianfds.com Or lfdsloans@outlook.com} or Text through Whatsapp +1-989 394 3740.
Coach - I'd like to make this pitching mound "foldable" - where would I cut in order to make this into a 3 piece unit? Would like to add wheels as well. Thanks for your help!
ReplyDeleteBaseball Mound, Baseball Mounds, Pitching Mounds For Sale, Portable Baseball Mound, Portable Baseball Mounds, fiberglass pitching mounds,Portable Baseball Pitching Mounds For Sale
ReplyDeleteFinancial Restoration Through the help of benjamin lee. Email: 247officedept@gmail.com that's his Email and this is his whatsapp number +1-989-394-3740 . I'mLeonardo Hugo a agronist who was able to revive his dying Livestock Feed Manufacturing through the help of a GodSent lender known as Benjamin Briel Lee the Loan Officer. I want you to know that his Service is the right place for you to resolve all your financial problem because am a living testimony and I can't just keep this to myself when others are looking for a way to be financially lifted. I want you all to contact this God sent lender using the details as stated in other to be a partaker of this great opportunity and also they work with good/reputable bank that wire money transfer without delay into my account.
ReplyDeletenice post
ReplyDeletehttp://allstarmounds.com
Mr Pedro recently helped us with a loan which we used to expand our business. The process was amazing! He was in touch with us frequently to check in and to update us on what was happening throughout our loan repayment. He was friendly and approachable and always able to clear up questions that we had. We had such a great experience working with Pedro!!
ReplyDeleteContact A Loan Officer Pedro
Email: pedroloanss@gmail.com
This might blow the mind, but you really don't need the middle area. Use two sections. The mount 4ftX2ft and a landing area on the same slope about 4ftX3ft. Each pitcher has a slightly different step and it can be placed according to their liking. They would get used to the gap after a little practice. Two pieces would be lighter and more Pitching Mounds.
ReplyDeleteThe courses will introduce you to the field of geotechnical engineering, and the faculty will help you get a job in this field. Learn more about cmt product on online.
ReplyDeleteIf you are looking for a top-quality portable baseball mound, contact AllStar Mounds today. The company offers the best baseball mounds that are fit to play, practice, and warm-up. Visit: https://allstarmounds.com/
ReplyDeleteFor these reasons, portable pitching mounds instantly became a huge hit in the baseball community. Shortly after the production of the first portable pitching mounds, many high schools, parks and recreation centers, leagues and even baseball parents began buying portable mounds like crazy.
ReplyDeleteBaseball is quite a popular sport with youngsters today. It involves two opposing teams taking up battling and fielding turn by turn. Baseball players always need a top-quality pitching mound that can improve their game efficiently. However, a Bullpen warm-up Pitching Mound holds more importance in this sport.
ReplyDeleteReduce the bother and the fuss with quick installations of the softball pitching mound. The portability ensures that shifting and installation are quick and easy. We spent quite a while since 1995 to get the specifications right. Practice indeed does make perfect. Built for the great outdoors, they can well withstand the severities of weather.
ReplyDeleteWith these features, your workers' payroll is more accurate and compliant with COVID. In addition to calculating labor, they can also generate certified payroll reports. Click here to get more information about employment rights.
ReplyDeleteThis comment has been removed by the author.
ReplyDeleteAffordable thanks
ReplyDelete